45 create labels with mail merge
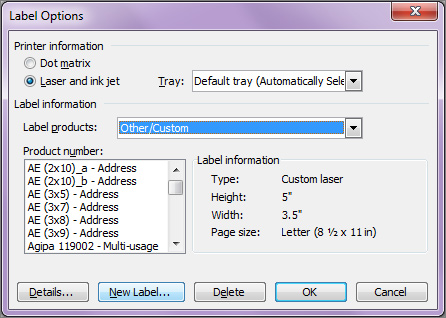
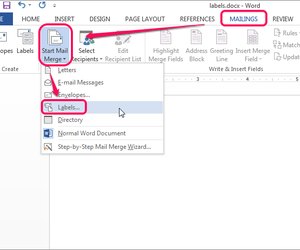
Create customize avery labels for mail merge in 24 hours by Chandrahash ... Here is my Service: Any mailing labels or mail merge. Excel files to Avery mailing labels or mail merge. Word files to Avery mailing labels or mail merge. PDF files to Avery mailing labels or mail merge. Images files to Avery mailing labels or mail merge. Websites to Avery mailing labels or mail merge. Added logo to Avery Labels. How to Create Mailing Labels in Word from an Excel List Step Two: Set Up Labels in Word Open up a blank Word document. Next, head over to the "Mailings" tab and select "Start Mail Merge." In the drop-down menu that appears, select "Labels." The "Label Options" window will appear. Here, you can select your label brand and product number. Once finished, click "OK."
Creating a Mail Merge to Labels in Microsoft Outlook If you want to do do a mail merge to create mailing labels, follow the steps in Use Outlook's Contacts with Mail Mergeto begin your mail merge. When the Mail merge dialog opens, select Labels from the Document Type menu. Click the Ok button and the merge document is created.

Create labels with mail merge
Mail merge using an Excel spreadsheet - support.microsoft.com Edit your mailing list Choose Edit Recipient List. In Mail Merge Recipients, clear the check box next to the name of any person who you don't want to receive your mailing. Note: You also can sort or filter the list to make it easier to find names and addresses. For more info, see Sort the data for a mail merge or Filter the data for a mail merge. Creating labels in mail merge - Microsoft Community In the meantime, you may refer to the following support articles for steps on how to create and print labels using mail merge. Make sure to check out the Prepare the worksheet data in Excel for the mail merge section. Create and print mailing labels for an address list in Excel Create and print labels using mail merge Looking forward to your reply. How To Print Address Labels Using Mail Merge In Word This opens the Mail Merge Wizard panel on the right hand side of your screen. This panel will guide you through the SIX STEPS of the mail merge. You will primarily use this panel to set up your address labels. MAIL MERGE: STEP 1 - SELECT DOCUMENT TYPE To create a set of address labels, you will need to select LABELS from the list of documents.
Create labels with mail merge. Use mail merge for bulk email, letters, labels, and envelopes Create and print sheets of mailing labels Directory that lists a batch of information for each item in your data source. Use it to print out your contact list, or to list groups of information, like all of the students in each class. This type of document is also called a catalog merge. Create a directory of names, addresses, and other information mail merge labels on multiple pages - Microsoft Community Answer. You need to select the destination for the execution of the merge by expanding the Finish & Merge dropdown in the Finish section of the Mailings tab of the ribbon - Either "Edit individual documents" which will create a new document containing as many pages of labels as dictated by the number of records in the data source, or "Printer ... How to mail merge and print labels in Microsoft Word Step one and two In Microsoft Word, on the Office Ribbon, click Mailings, Start Mail Merge, and then labels. In the Label Options window, select the type of paper you want to use. If you plan on printing one page of labels at a time, keep the tray on Manual Feed; otherwise, select Default. Create Custom Labels with Mail Merge: Microsoft Word - YouTube In this video, I will teach you how to create custom labels in Microsoft Word using the Mail Merge feature. Mail Merge is one of the rarely understood featur...
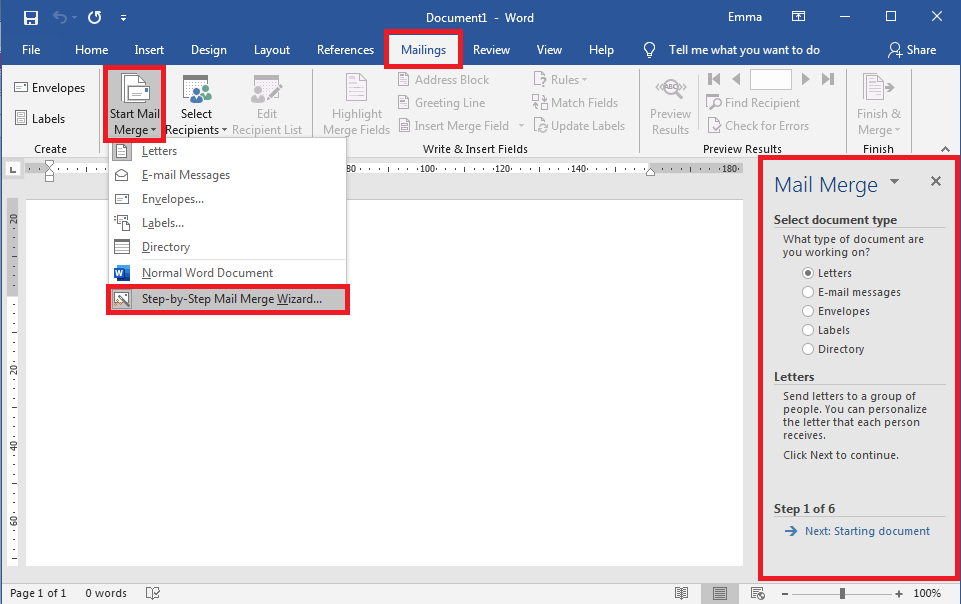
PDF How to Use Mail Merge to Create Mailing Labels in Word On the Mailings tab, click Start Mail Merge, and then click Step by Step Mail Merge Wizard. This will open a set of directions on the right side of the screen that we will be following. 1. Under Select document type, click Labels, and then click Next: Starting Document. (way at the bottom right of the screen) 2. The Easiest Way to Create a Mail Merge in Microsoft Word Envelopes and Labels: You can pick from different options such as envelope size, label type, and font. Then, print your envelopes or labels. You can create a mail merge in Microsoft Word from scratch for emails, letters, envelopes, or labels using the Mailings tab. But for the easiest way to set up a merge in Word, check out the mail merge wizard. Mail Merge Guide - Online Labels® How to Set Up Your Mail Merge Launch Maestro Label Designer and sign in. Open a new or saved template. Hover over "Tools" in the blue navigation bar and select "Mail Merge," then hit "Start Mail Merge." You will be prompted to add a new datalist or use an existing list. Note: If you don't have a document created yet, learn how to make one . How to Create Mail-Merged Labels in Word 2013 - dummies In Word, press Ctrl+N to start a new blank document and then choose Mailings→Start Mail Merge→Labels. The Label Options dialog box appears. From the Label Vendors drop-down list, choose Avery us Letter; in the Product Number list, choose 5160 Easy Peel Address Labels; click OK. Almost every size and shape of label has a code on the ...
Create and print labels using mail merge - Sibanye-Stillwater Step 2: Prepare the main document for the labels In Word, choose File > New > Blank Document. On the Mailings tab, in the Start Mail Merge group, choose Start Mail Merge > Labels. In the Label Options dialog box, under Label Information, choose your label supplier in the Label vendors list. How to Create Mail Merge Labels in Word 2003-2019 & Office 365 Click "Start Mail Merge." Select "Step by Step Mail Merge Wizard." Ensure "Change document layout" is selected and click "Next: Select recipients." Choose "Avery US Letter" from the second dropdown list and find the comparable Avery® product number from our cross-reference chart or choose "New Label" to manually enter the label specs. Create and print labels from Google Docs & Sheets - Labelmaker Create & print labels in Google Docs. Labelmaker is the best way to mail merge labels within Google Suite. Create and print labels from a wide choice of label templates including Avery labels for Google Docs or Google Sheets. Install Labelmaker. Labelmaker 5 stars ratings. Creating a Mail Merge for Labels with Word and Excel and adding an ... This video will show you how to quickly create Mailing Labels using Word and Excel. Additionally if you wanted to add a logo you'll need to right-click on t...
Mail Merge Labels - YouTube
How to mail merge and print labels from Excel - Ablebits (Or you can go to the Mailings tab > Start Mail Merge group and click Start Mail Merge > Labels .) Choose the starting document. Decide how you want to set up your address labels: Use the current document - start from the currently open document.
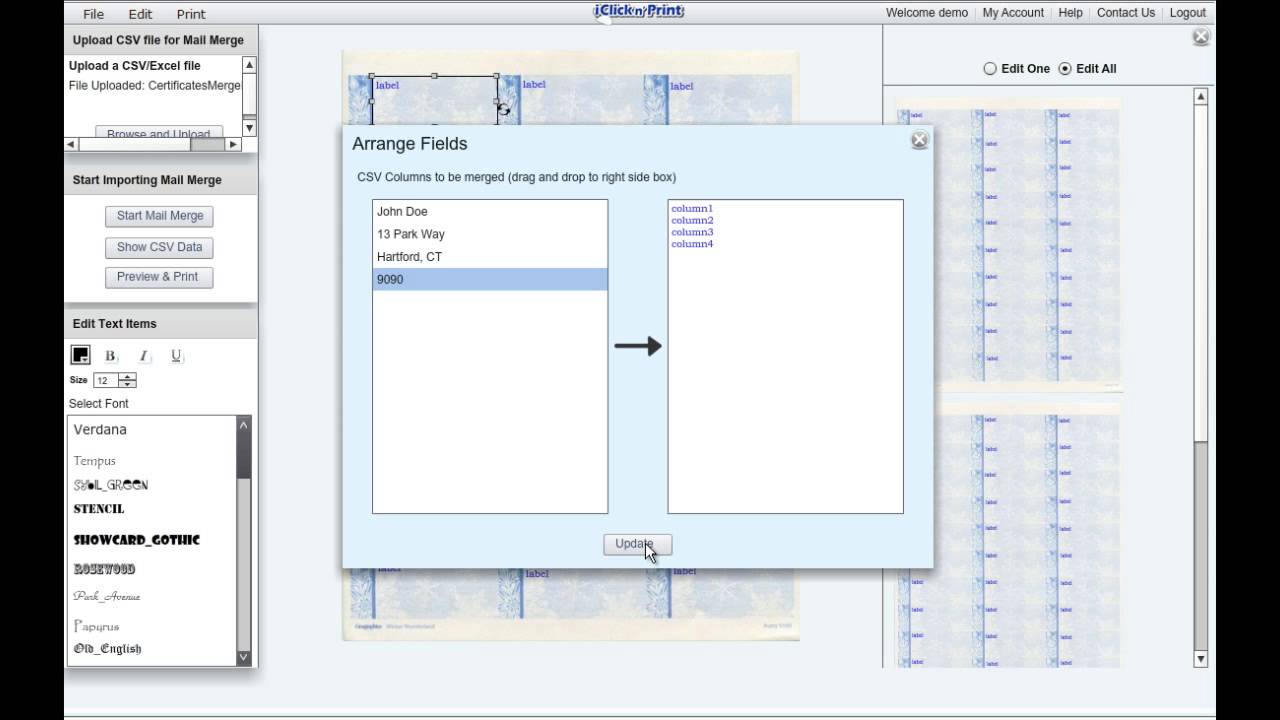
How to Create Mailing Labels with Click n' Merge - YouTube
How to Create Labels With a Mail Merge in Word 2019 Go to Mailings > Start Mail Merge > Labels. In the Label Options dialog box, choose your label supplier in the Label products list. In the Product number list, choose the product number on your package of labels. Tip: If none of the options match your labels, choose New Label, enter your label's information, and give it a name.
32 Mailing Label Mail Merge - Labels Database 2020
Creating Address Labels Using Mail Merge in Office 365 Creating Address Labels efficiently using Mail Merge 1. Launch Mail Merge from Word 2. Start a Document 3. Select your Recipients 4. Arrange your Labels 5. Preview your Labels 6. Complete the Merge Final Thoughts Frequently Asked Questions Now, if you're working on a tight budget or want to lower costs, a DIY approach may be ideal.

Mail Merge Word 2016 | Tutorial Office Word
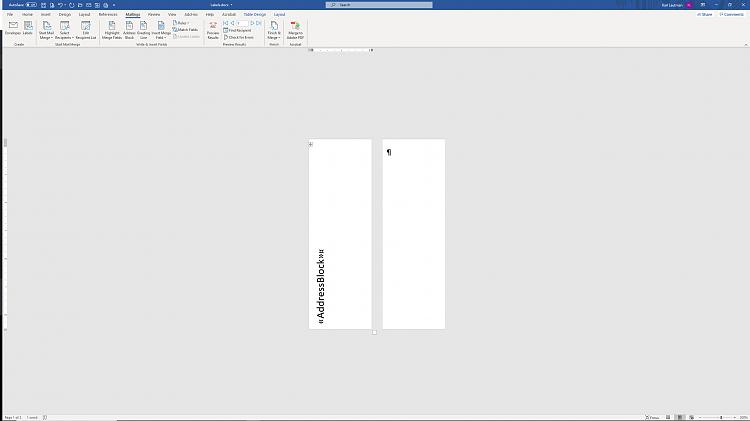
Video: Use mail merge to create multiple labels Use mail merge Create and print labels Video Use mail merge Video Format and add a graphic Video More options and custom labels Video Next: Creating an MLA paper with citations and a bibliography Overview Transcript If you wanted to create and print a bunch of recipient address labels, you could type them all manually in an empty label document.
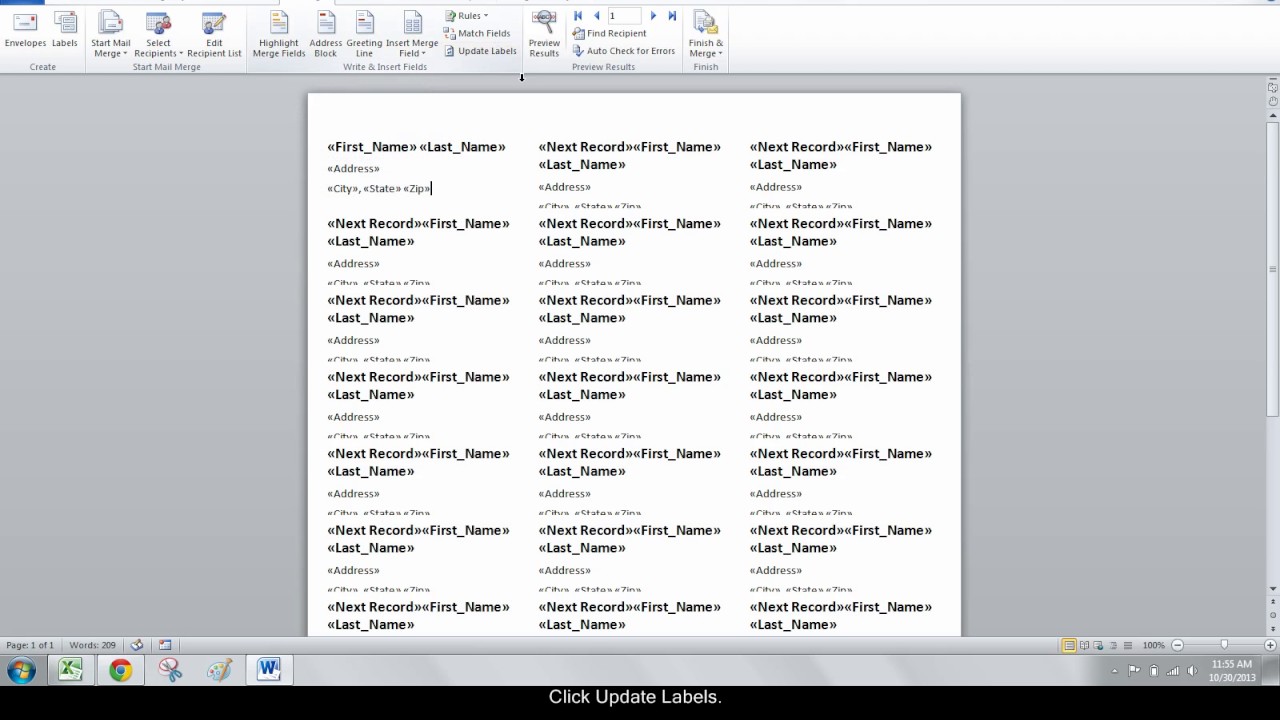
Update Labels not working in Mail Merge
Create Letters or Labels using Mail Merge Wizard Go to the Mailings tab. Click on Start Mail Merge, then Step by Step Mail Merge Wizard. Step 1: Select document type. Select the document type (Letters, Labels) Click Next: Starting document. Step 2: Starting document. If you're creating Letters select Use the current document. If you're creating Labels, click Label Options.

Mail Merge: Creating Form Letters and Labels
Video: Create labels with a mail merge in Word Once your mailing addresses are set up in an Excel spreadsheet (see the previous video to learn how), it's a snap to get Word to create mailing labels from them. Create your address labels In Word, click Mailings > Start Mail Merge > Step-by-Step Mail Merge Wizard to start the mail merge wizard.
How to Use Microsoft Mail Merge to Print 4up Place Cards
PDF Creating a Mail Merge from an Existing Document Before beginning the mail merge, either draft the correspondence or open the mailing labels. 5. Next, choose Mailings from the Toolbar or Toolbar Ribbon to start the Mail Merge. On the Start Mail Merge dropdown, select the starting document. If Labels is the starting document, there will be a further step to choose the type of labels.
Template Tuesday's Guide To…Using Mail Merge To Print Address Labels
How to Create and Print Labels in Word Using Mail Merge and Excel ... To run the mail merge and create a new merged label document: In the the main document in Word, click the Mailings tab in the Ribbon and then click Finish & Merge in the Finish group. A drop-down menu appears. Click Edit Individual Documents. A dialog box appears. Click Current Record or enter a selected range if necessary. Click OK.
How to Make Address Labels | Techwalla.com
How to Create a Label-Based Mail Merge Template in Microsoft Word Follow these steps to create a Microsoft Word labels template for use in Wealthbox Mail Merge: Open a blank document in Microsoft Word Select the "Mailings" Tab Once on the tab, please select "Start Mail Merge > Labels". Then select the size appropriate for your labels and click "OK" Click on the "Select Recipients > Type New List" 5.

6 Mail Merge Excel Template - Excel Templates - Excel Templates
How To Print Address Labels Using Mail Merge In Word This opens the Mail Merge Wizard panel on the right hand side of your screen. This panel will guide you through the SIX STEPS of the mail merge. You will primarily use this panel to set up your address labels. MAIL MERGE: STEP 1 - SELECT DOCUMENT TYPE To create a set of address labels, you will need to select LABELS from the list of documents.
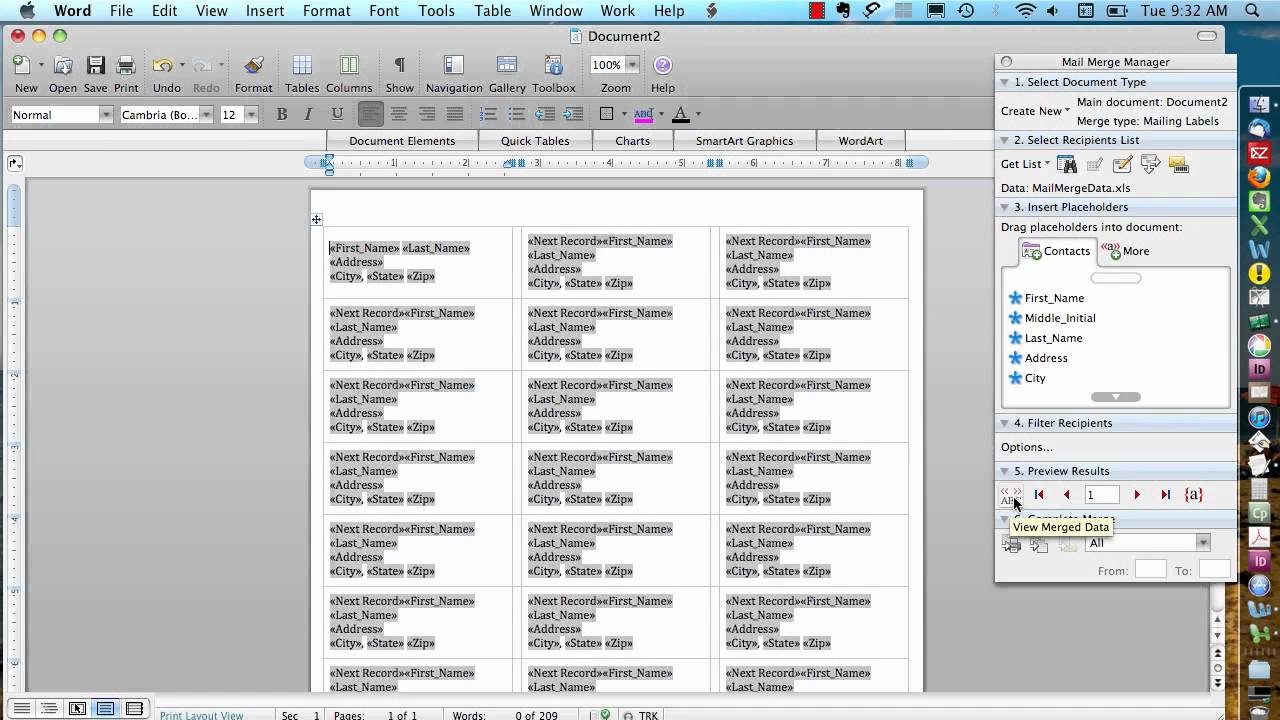
Mail Merge for Mac - Form Letters - YouTube
Creating labels in mail merge - Microsoft Community In the meantime, you may refer to the following support articles for steps on how to create and print labels using mail merge. Make sure to check out the Prepare the worksheet data in Excel for the mail merge section. Create and print mailing labels for an address list in Excel Create and print labels using mail merge Looking forward to your reply.

mail merge labels fig 1 tuxlabel - Top Label Maker
Mail merge using an Excel spreadsheet - support.microsoft.com Edit your mailing list Choose Edit Recipient List. In Mail Merge Recipients, clear the check box next to the name of any person who you don't want to receive your mailing. Note: You also can sort or filter the list to make it easier to find names and addresses. For more info, see Sort the data for a mail merge or Filter the data for a mail merge.
How to create Labels using Mail Merge in Microsoft Word 2007 - YouTube
Making Address Labels with Mail Merge - YouTube
Label Template For Excel | printable label templates
Post a Comment for "45 create labels with mail merge"